Importing data through Layer Importer user interface
Importing a single shapefile
The following example will import a zipped shapefile roads.zip in the opengeo workspace. This file will need to be either on the machine that is running GeoServer or accessible to that machine in some way, as importing a shapefile from a remote client is not currently supported.
Open the Layer Importer. You will need to log in with administrator credentials.
In the box marked Choose a data source to import from select Spatial Files.

Spatial Files data source
In the box marked Configure the data source, click Browse... to open the file chooser.

Click Browse to select a file
Navigate through the directory hierarchy to the file and click to select it. Don’t click OK unless you want to import all spatial files in the directory.

Selecting a zipped shapefile
In the box marked Workspace, select opengeo.

Selecting the opengeo workspace
Click Next to continue.
The file will be analyzed by the Layer Importer. On the next page, the layer will be displayed and selected for import. Click Import to complete to the process.

Shapefile ready for import
The layer will be loaded into GeoServer. After completion, a select box will appear next to the layer, containing links to the (OpenLayers) Layer Preview, GeoExplorer, and Google Earth. Click on any of these to view the newly-loaded layer.

Layer previewing options
Note
The Layer Importer doesn’t require shapefiles to be archived. As shown in the next example, pointing the Layer Importer to a directory that contains a single shapefile will be imported in exactly the same way, so long as the directory contains all of the required component files (.shp, .shx, .dbf, etc.).
Importing multiple shapefiles
The following example will load a directory of shapefiles in the opengeo workspace. This directory will need to be either on the machine that is running GeoServer or accessible to that machine in some way, as importing shapefiles from a remote client is not currently supported.
Open the Layer Importer. You will need to log in with administrator credentials.
In the box marked Choose a data source to import from select Spatial Files.
Spatial Files data source
In the box marked Configure the data source, click Browse... to open the file chooser.
Click Browse to select a file
Navigate through the directory hierarchy to the directory that contains the shapefiles. Click to open that directory, so that the contents are showing, then click OK.

Selecting a directory of shapefiles
In the box marked Workspace, select opengeo.
Selecting the opengeo workspace
Click Next to continue.
The contents of the directory will be analyzed by the Layer Importer. On the next page, all layers found will be displayed and selected for import. Click Import to complete to the process.

List of shapefiles ready for import
The layers will all be loaded into GeoServer. After completion, a select box will appear next to each layer, containing links to the (OpenLayers) Layer Preview, GeoExplorer, and Google Earth. Click on any of these to view the newly-loaded layers.
Layer previewing options
Importing a GeoTIFF file
The following example will import a zipped GeoTIFF file landuse.zip and create a new data store in the opengeo workspace.
The following example will load a directory of shapefiles in the opengeo workspace. This directory will need to be either on the machine that is running GeoServer or accessible to that machine in some way, as importing shapefiles from a remote client is not currently supported.
Open the Layer Importer. You will need to log in with administrator credentials.
In the box marked Choose a data source to import from select Spatial Files.
Spatial Files data source
In the box marked Configure the data source, click Browse... to open the file chooser.
Click Browse to select a file
Navigate through the directory hierarchy to the file and click to select it. Don’t click OK unless you want to import all spatial files in the directory.

Selecting a zipped GeoTIFF
In the box marked Workspace, select opengeo.
Selecting the opengeo workspace
In the box marked Store, select Create new.

Selecting a new store to be created
Click Next to continue.
The file will be analyzed by the Layer Importer. On the next page, the layer will be displayed and selected for import. Click Import to complete to the process.

GeoTIFF ready for import
The layer will be loaded into GeoServer. After completion, a select box will appear next to the layer, containing links to the (OpenLayers) Layer Preview, GeoExplorer, and Google Earth. Click on any of these to view the newly-loaded layer.
Layer previewing options
Note
The Layer Importer doesn’t require GeoTIFFs to be archived. As shown in the previous example, pointing the Layer Importer to a directory that contains a single GeoTIFF will be imported in exactly the same way.
Importing PostGIS tables
The following example will import PostGIS tables from a database called municipal into GeoServer in the opengeo workspace. Each table will be loaded as a layer.
- Open the Layer Importer. You will need to log in with administrator credentials.
- In the box marked Choose a data source to import from select PostGIS.
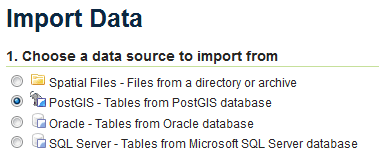
PostGIS data source
Fill in the connection parameters. On a default Linux installation, for example, the form fields would be:
Field Value Connection type Default Host localhost Port 5432 Database municipal Schema public Username postgres Password postgres 
PostGIS connection parameters
In the box marked Workspace, select opengeo.
Selecting the opengeo workspace
Click Next to continue.
The database will be analyzed by the Layer Importer. On the next page, every table containing spatial information that GeoServer can parse will be displayed and selected for import. Click Import to complete to the process.
Every table will be loaded as layers in GeoServer. After completion, a select box will appear next to each layer, containing links to the (OpenLayers) Layer Preview, GeoExplorer, and Google Earth. Click on any of these to view the newly-loaded layer.
Layer previewing options