GeoExplorer workspace
The GeoExplorer workspace is divided into three main areas:
- Map Window—Map display window
- GeoExplorer toolbar—Main application toolbar
- Layers panel–Displays a list of map layers and provides access to the Layer Properties panel and Layer Styles panel
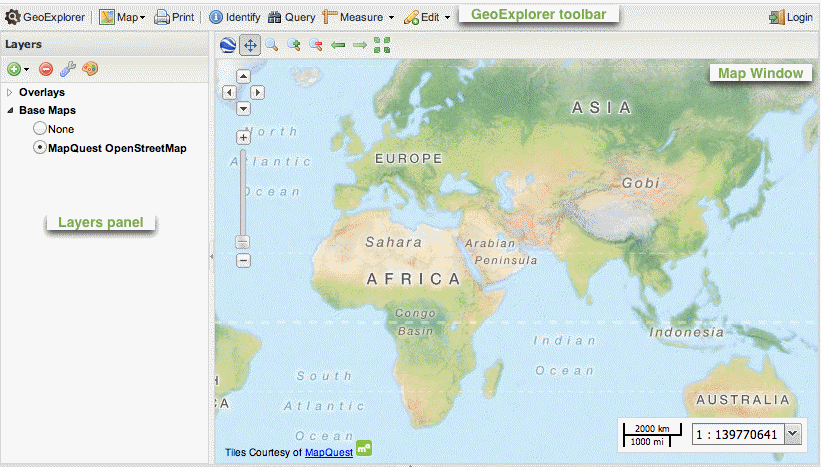
GeoExplorer workspace
Map Window
The Map Window provides the main display area for any layers that have been added to GeoExplorer. The contents of the Map Window are configured via the Layers panel and the Map Window toolbar provides display and navigation tools for zooming, panning, and switching to the 3D viewer.
Map Window toolbar
The Map Window toolbar provides access to the following tools:

Map Window toolbar
| Button | Name | Description |
|---|---|---|

|
Switch to 3D Viewer | Changes map view to 3D. Requires the Google Earth browser plugin. |

|
Pan map | Pan the Map Window by click and drag (enabled by default). Shift, click, and drag together zooms in to a user-defined extent. |

|
Zoom by dragging a box | Zoom to user-defined extent |

|
Zoom in | Increases the zoom level by one |

|
Zoom out | Decreases the zoom level by one |

|
Zoom to previous extent | Returns to the previous map extent |

|
Zoom to next extent | Returns to the next map extent (activated only after using Zoom to previous extent) |

|
Zoom to max extent | Zooms to the maximum extent of all layers |
GeoExplorer toolbar

GeoExplorer toolbar
The GeoExplorer toolbar provides access to the following tools:
| Button | Name | Description |
|---|---|---|

|
GeoExplorer | Displays information about the GeoExplorer application |

|
Publish map | Composes a map application based on the current Map Window and generates HTML code to embed the application into a web page. |

|
Save map | Saves the current Map Window composition and generates a URL to revisit the current configuration. Requires Login to local GeoServer. |

|
Creates a PDF of the current Map Window composition | |

|
Identify | Displays feature information (attributes) for the feature at a user-defined location in the Map Window |

|
Measure | Measures distance or area in the Map Window |

|
Query | Queries the selected layer. Options are Query by current map extent and Query by attributes. |

|
Create | Creates a new feature in the selected layer. Works with vector overlay layers only and requires Login to local GeoServer. |

|
Modify | Edits an existing feature in the selected layer. Works with vector overlay layers only and requires Login to local GeoServer. |

|
Login | Login to local GeoServer (if available) for creating and editing features and style settings |
Layers panel
Layers panel
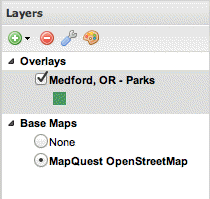
The Layers panel contains a list of layers, managed under two folders—Overlays and Base Maps—and a Layers panel toolbar.
Individual Overlays layer visibility settings may be configured as required. To make a layer invisible, clear the check box next to layer. To make the layer visible again, select the check box.
Overlays
The Overlays folder is initially empty when GeoExplorer is first started. You can Add layers to the list by clicking Add layers  on the Layers panel toolbar.
Note
Depending on the source of the layer, the new layer will either be added to the Overlays folder or the Base Maps folder. Background mapping, such as that provided by Google and OpenStreetMap, will be added to the Base Maps folder.
Overlays layers are set to be transparent, so multiple layers may be viewed in the Map Window at the same time. The legend for each layer is generated directly from the WMS GetLegendGraphic request.
Base Maps
The Base Maps folder contains base, or background, layers. A base layer will always be drawn beneath all other Overlays layers. Although only one base layer can be active at any time, it is possible to have multiple base layers in the list. It is also possible to drag layers between the Base Maps folder and the Overlays folder.
The default base layer is Mapquest OpenStreetMap. Having no base layer (None) for the Map Window is also an option. As with the Overlays list, you can Add layers to the Base Maps folder by clicking Add layers on the Layers panel toolbar.
Layer order
Layers in the Layers panel may be reordered to affect the rendering, or draw, order. To change the layer order, click and drag the layers in the Overlays list in the Layers panel. The layers will be rendered in the order in which they are listed—the layer at the top of the list will display on the top of all of the other layers, the next layer will be drawn below that, and so on. The selected base layer will always be drawn beneath all Overlays layers.
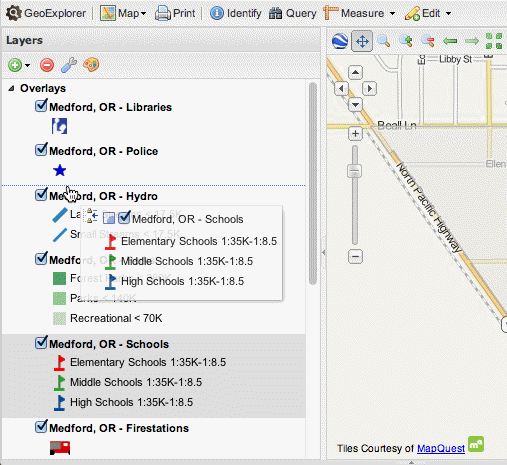
Reordering Layers
Layers panel toolbar
The Layers panel toolbar provides access to the following tools:
| Button | Name | Description |
|---|---|---|
|
|
Add layers | Displays the Available Layers panel for adding new layers to GeoExplorer |

|
Remove layer | Removes the currently selected layer from the list |

|
Layer Properties | Displays the Layer Properties panel for viewing and editing the properties of the selected layer (layer name and description, display settings, and layer styles). For attribute information, use the Identify tool. |

|
Layer Styles | Displays the Layer Styles panel for editing layer styling rules. Requires Login to local GeoServer. |
Layers panel shortcut menu
You can also right-click an entry in the layers list to display a shortcut menu.

Layer shortcut menu
This shortcut menu provides access to four tools:
| Icon | Name | Description |
|---|---|---|

|
Zoom to layer extent | Zooms to the extent of the selected layer |
|
|
Remove layer | Removes the currently selected layer from the list |
|
|
Layer Properties | Displays the Layer Properties panel for viewing and editing the properties of the selected layer (layer name and description, display settings, and layer styles). For attribute information, use the Identify tool. |
|
|
Layer Styles | Displays the Layer Styles panel for editing layer styles. Requires Login to local GeoServer. |
Layer Properties panel
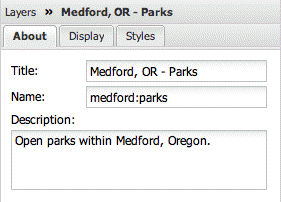
Layer Properties panel
The Layer Properties panel displays the properties of the currently selected layer, including layer name and description, and the display and style settings. You can also edit the Layer Properties for each layer as required.
