Using WPS with OpenLayers and the Boundless SDK
OpenLayers includes a Web Processing Service (WPS) client. With this client you can employ server processes in browser-based mapping applications. For example, you could perform certain geometry manipulations on the server that are not available in a browser environment. The WPS client also supports process chaining, which allows the server to perform more complex operations without the need to return the result to the client at each intermediate step.
This tutorial will describe how to use a WPS process to manipulate a locally-created geometry in the browser, first using OpenLayers, and then by creating an interactive application using the Boundless SDK.
Creating an OpenLayers.WPSClient instance
The starting point for interacting with WPS processes is an OpenLayers.WPSClient instance. Upon creation, the servers that the client should have access to are configured:
var wpsClient = new OpenLayers.WPSClient({
    servers: {
        local: '/geoserver/wps'
    }
});
This code block creates a OpenLayers.WPSClient instance that points to the local GeoServer. This instance is configured with the server defaults.
Using a single process to manipulate geometries
Suppose you have a polygon:
POLYGON((110 20,120 20,120 10,110 10,110 20),
        (112 17,118 18,118 16,112 15,112 17))
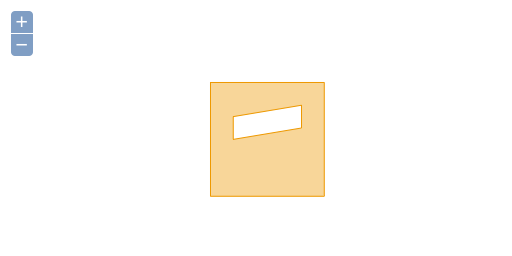
Sample polygon
and you want to split it along this line:
LINESTRING(117 22,112 18,118 13, 115 8)
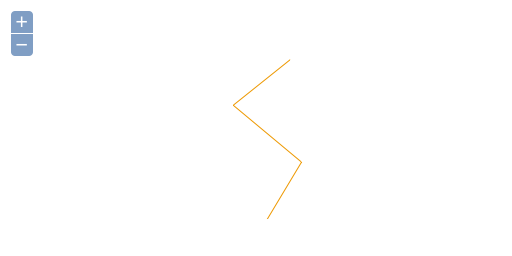
Sample line for splitting
These geometries can be programmatically created in OpenLayers using OpenLayers.Geometry.fromWKT:
var mypolygon = OpenLayers.Geometry.fromWKT(
    'POLYGON(' +
        '(110 20,120 20,120 10,110 10,110 20),' +
        '(112 17,118 18,118 16,112 15,112 17)' +
    ')'
);
var myline = OpenLayers.Geometry.fromWKT(
    'LINESTRING(117 22,112 18,118 13, 115 8)'
);
The specific process we are going to employ here is the geo:splitPolygon process. This takes a polygon and line as inputs, and returns a geometry collection consisting of polygons that are created through bisecting the polygon with the line. With the OpenLayers.WPSClient instance, you can use this process in a web application. The following code block executes the geo:splitPolygon process with the polygon and line geometries as inputs.
wpsClient.execute({
    server: 'local',
    process: 'geo:splitPolygon',
    inputs: {
        polygon: mypolygon,
        line: myline
    },
    success: function(outputs) {
        for (var i=0, ii=outputs.result.length; i<ii; ++i) {
            alert(outputs.result[i].geometry.toString());
        }
    }
});
Process execution is asynchronous. Behind the scenes, the WPSClient first sends a WPS DescribeProcess request to the server, so the process knows the available inputs and outputs as well as the supported formats. With this information, the process can build the correct configuration for the actual WPS Execute request, which then follows. Once the response from that Execute request is available, the callback function configured with the success option (outputs) will be executed.
Outputs for spatial processes are always an array of OpenLayers.Feature.Vector instances.
The final success function opens alert boxes that display the Well Known Text representation of the two resulting split geometries.

WKT representation of one of the result geometries
Determining process input identifiers
The names of the inputs must match the input identifiers of the process. In this case, the input identifiers for the geo:splitPolygon process are named polygon and line. There are two ways to find this information.
It is simplest to look up the input identifiers in the WPS Request Builder of the GeoServer instance. The WPS Request Builder can be found in the Demos section of the UI.
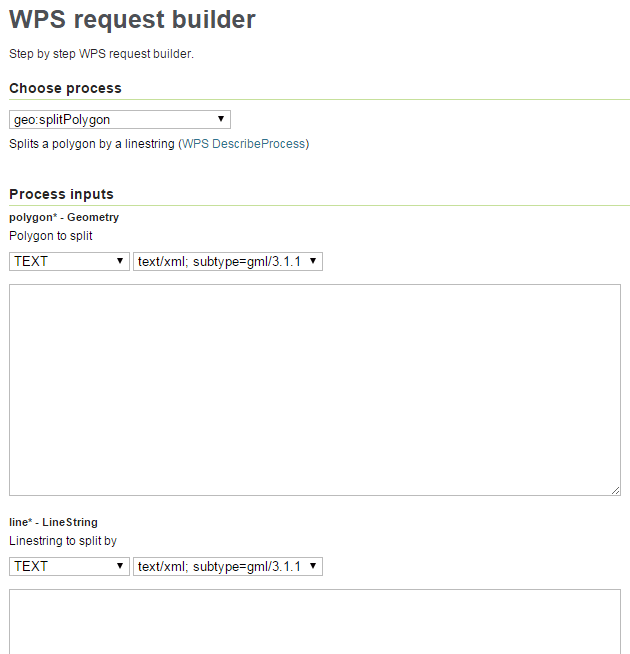
WPS Request Builder in GeoServer
You can find the input identifiers manually by running a DescribeProcess request and noting the
<ows:Identifier>for each<Input>. For example:http://GEOSERVER_HOME/ows?service=wps&version=1.0.0&request=DescribeProcess&Identifier=geo:splitPolygon
This would return:
<ProcessDescription>
    ...
    <DataInputs>
        <Input maxOccurs="1" minOccurs="1">
            <ows:Identifier>polygon</ows:Identifier>
            ...
        </Input>
        <Input maxOccurs="1" minOccurs="1">
            <ows:Identifier>line</ows:Identifier>
            ...
        </Input>
    </DataInputs>
    ...
</ProcessDescription>
Chaining processes for more complex operations
Chaining processes involves taking the output of one process and routing it to the input of another. In this case, the execute method of the WPSClient only needs to be called on the final process in the processing chain, while the other processes are configured separately.
An example that uses chaining involves determining the intersection of polygon and line geometries and then creating buffers around the resulting intersection lines. On a map, the result (including the source geometries) would look like this:
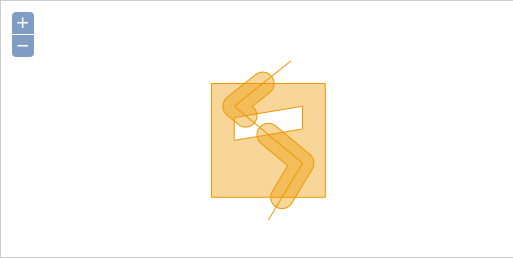
Result of intersection/buffer processes
Instead of calling execute directly from the WPSClient as in the previous section, we will get instances of the processes we need:
var intersection = wpsClient.getProcess('local', 'geo:intersection');
var buffer = wpsClient.getProcess('local', 'geo:buffer');
The geo:intersection process is the first process in the chain, so configure it first:
intersection.configure({
    inputs: {
        a: mypolygon,
        b: myline
    }
});
Note
We are using the same WKT geometries (mypolygon, myline) as defined in the previous section. Also, see the note on Determining process input identifiers to see where the a and b identifiers are determined.
With the intersection function defined, let’s configure and execute the buffer process with the output of the intersection process as its input:
buffer.execute({
    inputs: {
        geom: intersection.output(),
        distance: 1
    },
    success: function(outputs) {
        for (var i=0, ii=outputs.result.length; i<ii; ++i) {
            alert(outputs.result[i].geometry.toString());
        }
    }
});
The intersection process has an output method which we use to get a handle that we can pass as input to the buffer process. The rest of the code block is equivalent to the configuration for the geo:splitPolygon example above.
Processes with multiple outputs
Processes can have multiple inputs, but they can also have multiple outputs. When chaining a process output to an input, the output method can be called with an output identifier as argument.
In the same way, a configuration object for the execute method can take an optional output property. This will be available as a property in the outputs argument that is passed to the success callback. If omitted, the first output advertised in the DescribeProcess output will be available as outputs.result, as was seen in the previous example.
Note
Outputs, like inputs, have identifiers that can be looked up through a DescribeProcess request or through the GeoServer WPS Request Builder. See Determining process input identifiers for more information.
The following code block shows how the intersection/buffer example in the previous section could be modified in order to accept multiple outputs.
buffer.execute({
    inputs: {
        // chain the 'result' output to the 'geom' input
        geom: intersection.output('result'),
        distance: 1
    },
    // make the 'result' output available in 'outputs'
    output: 'result',
    success: function(outputs) {
        for (var i=0, ii=outputs['result']length; i<ii; ++i) {
            alert(outputs['result'][i].geometry.toString());
        }
    }
});
In this case, the geo:buffer process doesn’t produce multiple outputs, but it is trivial to replace this process in your code with one that does.
Building an interactive application
Using the Boundless SDK, you can create a lightweight demo application that allows the user to draw geometries and execute the SplitPolygon and Intersection/Buffer processes as created above.
To create our custom application, we must first create a minimal app.js file and a custom app_wpsdemo plugin in its own WPSDemo.js file. These files will then be copied into a template application.
app.js
The app.js file is below (Download). Replace the existing app.js file (found at <sdk_app>/src/app/app.js) with this one:
/**
 * @require OpenLayers/Layer/Vector.js
 * @require OpenLayers/Renderer/Canvas.js
 * @require OpenLayers/Renderer/VML.js
 * @require GeoExt/widgets/ZoomSlider.js
 * @require widgets/Viewer.js
 * @require plugins/OLSource.js
 * @require plugins/OSMSource.js
 * @require WPSDemo.js
 */

var app = new gxp.Viewer({
    // Our custom plugin that provides drawing and processing actions
    tools: [{ ptype: "app_wpsdemo" }],
    sources: {
        osm: { ptype: "gxp_osmsource" },
        ol: { ptype: "gxp_olsource" }
    },
    map: {
        projection: "EPSG:3857",
        center: [-10764594.758211, 4523072.3184791],
        zoom: 3,
        layers: [{
            source: "osm",
            name: "mapnik",
            group: "background"
        }, {
            // A vector layer to display our geometries and processing results
            source: "ol",
            name: "sketch",
            type: "OpenLayers.Layer.Vector"
        }],
        items: [{
            xtype: "gx_zoomslider",
            vertical: true,
            height: 100
        }]
    }
});
The important aspects of this minimal application are the dependencies, the app_wpsdemo plugin, and the vector layer created from the ol source. For the vector layer, we require renderers in addition to OpenLayers/Layer/Vector.js:
OpenLayers/Renderer/Canvas.jsOpenLayers/Renderer/VML.js
Both renderers are used here for better compatibility. The Canvas renderer works for all modern desktop and mobile browsers, while VML works for Internet Explorer 8 and older. It is the application developer’s decision for which platforms should be supported.
WPSDemo.js
The WPSDemo.js file is below (Download). This file should be saved in the same directory as app.js (<sdk_app>/src/app/WPSDemo.js):
/**
 * @require plugins/Tool.js
 * @require GeoExt/widgets/Action.js
 * @require OpenLayers/Control/DrawFeature.js
 * @require OpenLayers/Control/DragFeature.js
 * @require OpenLayers/Handler/Polygon.js
 * @require OpenLayers/Handler/Path.js
 * @require OpenLayers/WPSClient.js
 */

var WPSDemo = Ext.extend(gxp.plugins.Tool, {

    ptype: 'app_wpsdemo',

    /** Initialization of the plugin */
    init: function(target) {
        WPSDemo.superclass.init.apply(this, arguments);

        // Create a WPSClient instance for use with the local GeoServer
        this.wpsClient = new OpenLayers.WPSClient({
            servers: {
                local: '/geoserver/wps'
            }
        });

        // Add action buttons when the viewer is ready
        target.on('ready', function() {
            // Get a reference to the vector layer from app.js
            this.layer = target.getLayerRecordFromMap({
                name: 'sketch',
                source: 'ol'
            }).getLayer();
            // Some defaults
            var actionDefaults = {
                map: target.mapPanel.map,
                enableToggle: true,
                toggleGroup: this.ptype,
                allowDepress: true
            };
            this.addActions([
                // Action for drawing new geometreis
                new GeoExt.Action(Ext.apply({
                    text: 'Draw',
                    control: new OpenLayers.Control.DrawFeature(
                        this.layer, OpenLayers.Handler.Polygon
                    )
                }, actionDefaults)),
                // Action for dragging existing geometries
                new GeoExt.Action(Ext.apply({
                    text: 'Drag',
                    control: new OpenLayers.Control.DragFeature(this.layer)
                }, actionDefaults)),
                // Action for splitting by drawing a line
                new GeoExt.Action(Ext.apply({
                    text: 'Split',
                    control: new OpenLayers.Control.DrawFeature(
                        this.layer, OpenLayers.Handler.Path, {
                        eventListeners: {
                            featureadded: this.split,
                            scope: this
                        }
                    })
                }, actionDefaults)),
                // Action for intersection+buffer by drawing a line
                new GeoExt.Action(Ext.apply({
                    text: 'Intersect+Buffer',
                    control: new OpenLayers.Control.DrawFeature(
                        this.layer,OpenLayers.Handler.Path, {
                        eventListeners: {
                            featureadded: this.intersectBuffer,
                            scope: this
                        }
                    })
                }, actionDefaults))
            ]);
        }, this);
    },

    /** Handler function for splitting geometries */
    split: function(evt) {
        var line = evt.feature;
        var poly;
        for (var i=this.layer.features.length-1; i>=0; --i) {
            poly = this.layer.features[i];
            if (poly !== line && poly.geometry.intersects(line.geometry)) {
                this.wpsClient.execute({
                    server: 'local',
                    process: 'geo:splitPolygon',
                    inputs: { polygon: poly, line: line },
                    success: this.addResult,
                    scope: this
                });
                this.layer.removeFeatures([poly]);
            }
        }
        this.layer.removeFeatures([line]);
    },

    /** Handler function for intersection+buffer */
    intersectBuffer: function(evt) {
        var line = evt.feature;
        var poly;
        for (var i=this.layer.features.length-1; i>=0; --i) {
            poly = this.layer.features[i];
            if (poly !== line && poly.geometry.intersects(line.geometry)) {
                this.wpsClient.execute({
                    server: 'local',
                    process: 'geo:buffer',
                    inputs: {
                        distance:
                            // buffer distance is 10 pixels
                            10 * this.target.mapPanel.map.getResolution(),
                        geom:
                            this.wpsClient.getProcess(
                                'local', 'geo:intersection'
                            ).configure({
                                inputs: { a: line, b: poly }
                            }).output()
                    },
                    success: this.addResult,
                    scope: this
                });
            }
        }
        this.layer.removeFeatures([line]);
    },

    /** Helper function for adding process results to the vector layer */
    addResult: function(outputs) {
        this.layer.addFeatures(outputs.result);
    }

});

Ext.preg(WPSDemo.prototype.ptype, WPSDemo);
This script creates four action buttons in the init method:
- Draw
- Drag
- Split process
- Intersection+Buffer process
Both processes are executed when the user finishes drawing a line. The split and intersectBuffer methods are responsible for configuring and executing the required processes, and the addResult method adds the resulting geometries to a map.
Results
After these files have been created and placed in the proper directory, the application can be tested.
Note
Please see the Testing the application section for more information on launching this application.
After drawing two polygons, splitting them, dragging them around a bit, and then executing two different Intersection/Buffer processes, our map could look like this:
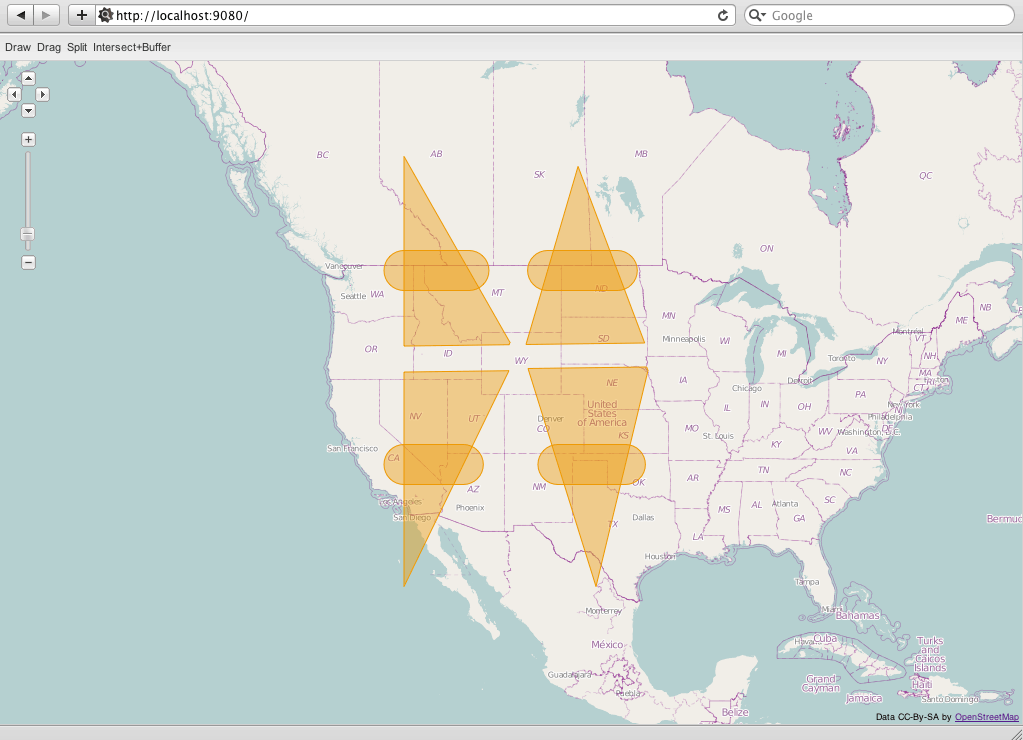
Sample map showing process output