Creating WPS processes with Java
Web Processing Service (WPS) processes are able to perform almost any kind of computation. OpenGeo Suite supplies many useful WPS processes built in to GeoServer.
However, for even more capability, GeoServer can be extended by adding new WPS processes. This section describes creating a custom WPS process in Java and how to deploy and run it in GeoServer.
Overview
A WPS process is implemented as a Java service provider, allowing GeoServer to discover and publish your custom process. It is a Java class that provides an execute method. The execute method accepts parameters which correspond to the WPS parameters, and it returns a value which becomes the output of the process. The class also provides metadata to specify the names and descriptions of the process and its parameters.
The GeoTools library used by GeoServer provides a convenient framework for building process classes with a minimum of boilerplate code. The GeoTools Process API has the following features:
- Allows using Java annotations to specify the metadata
- Infers the types of process parameters and outputs via reflection
- Handles conversion between XML representations and Java objects
- Handles reporting any exceptions thrown by a process
GeoServer includes many powerful libraries that can be leveraged in a process. A process can also use external Java libraries, but in that case the external libraries need to be deployed along with the process.
To create a custom WPS process, you will need to create a new Java project, either with an IDE or using command-line tools.
This tutorial shows the use of the popular Eclipse IDE. Other IDEs such as Netbeans or IntelliJ IDEA can be used as well. In addition, Maven will be used to build the project and manage its dependencies.
About the process
We will create a process called splitPolygon in a project called wps-demo. This process splits a polygon geometry by a line crossing it. The inputs are the polygon to split and the line to split by. The output is the geometry representing the collection of polygons resulting from the split.
Create the Java project
We’ll use Maven to create the Java project for the process. To do that we use the Maven Archetype plugin, a project templating tool.
Since a custom WPS process is packaged as a regular JAR file the standard archetype can be used for this project. It will generate the project directory structure, a Maven POM file describing the project, and some useful Java artifacts.
Enter the following in a console:
mvn archetype:generate -DarchetypeArtifactId=maven-archetype-quickstart -DarchetypeVersion=1.1 -DgroupId=org.example.wps -DartifactId=wps-demo -Dversion=1.0 -DinteractiveMode=falseThis command instructs Maven to generate a project using the following information:
- The Maven
groupIdand the project’s Java package are namedorg.example.wps - The name of the project is
wps-demo - The version for the project build artifacts is
1.0
- The Maven
You should end up with a project directory named
wps-demowith thepom.xmlfile inside it. Open this file in a text editor and add the following GeoTools library dependencies to this file:<dependency> <groupId>org.geotools</groupId> <artifactId>gt-process</artifactId> <version>${geotools.version}</version> </dependency> <dependency> <groupId>org.geotools</groupId> <artifactId>gt-process-geometry</artifactId> <version>${geotools.version}</version> </dependency>
In addition, add the following lines inside the
<properties>block (typically beneath the line for<project.build.sourceEncoding>, replacingGEOSERVER_VERSIONandGEOTOOLS_VERSIONwith the versions used by OpenGeo Suite:<geoserver.version>GEOSERVER_VERSION</geoserver.version> <geotools.version>GEOTOOLS_VERSION</geotools.version>
Warning
You must make sure that the GeoServer and GeoTools versions match the ones used by OpenGeo Suite. You can check the versions by navigating to the About GeoServer section of the GeoServer admin interface. The GeoServer version will be shown under Version, and the GeoTool version will be shown under GeoTools Version.
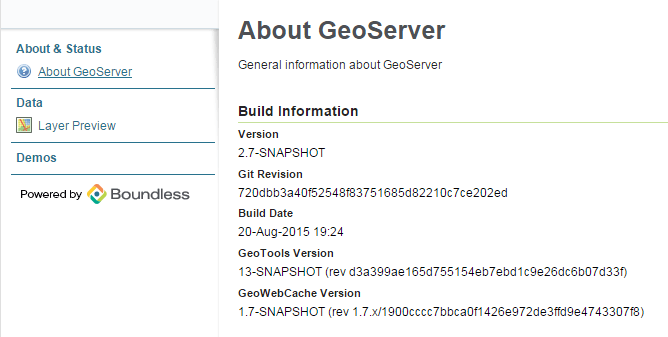
GeoServer showing version numbers (yours will likely be different)
In the same file anywhere inside the
<project>block, add a reference to the Boundless Maven repository. This will provide access to the required libraries.<repositories> <repository> <id>boundless</id> <name>Boundless Maven Repository</name> <url>http://repo.boundlessgeo.com/main</url> </repository> </repositories>
The final file should look similar like this (but with different version numbers, as indicated above):
<project xmlns="http://maven.apache.org/POM/4.0.0" xmlns:xsi="http://www.w3.org/2001/XMLSchema-instance"
  xsi:schemaLocation="http://maven.apache.org/POM/4.0.0 http://maven.apache.org/xsd/maven-4.0.0.xsd">
  <modelVersion>4.0.0</modelVersion>

  <groupId>org.example.wps</groupId>
  <artifactId>wps-demo</artifactId>
  <version>1.0</version>
  <packaging>jar</packaging>

  <name>wps-demo</name>
  <url>http://maven.apache.org</url>

  <properties>
    <project.build.sourceEncoding>UTF-8</project.build.sourceEncoding>
    <geoserver.version>2.8-SNAPSHOT</geoserver.version>
    <geotools.version>14-SNAPSHOT</geotools.version>
  </properties>

  <repositories>
    <repository>
      <id>boundless</id>
      <name>Boundless Maven Repository</name>
      <url>http://repo.boundlessgeo.com/main</url>
    </repository>
  </repositories>

  <dependencies>
    <dependency>
      <groupId>junit</groupId>
      <artifactId>junit</artifactId>
      <version>3.8.1</version>
      <scope>test</scope>
    </dependency>
    <dependency>
      <groupId>org.geotools</groupId>
      <artifactId>gt-process</artifactId>
      <version>${geotools.version}</version>
    </dependency>
    <dependency>
      <groupId>org.geotools</groupId>
      <artifactId>gt-process-geometry</artifactId>
      <version>${geotools.version}</version>
    </dependency>
  </dependencies>
</project>
Save and close this file.
With the project definition and dependencies set up, we can create the Eclipse project by going into the
wps-demodirectory and issuing the following command:mvn eclipse:eclipseWe now have a Java project that can be imported into an Eclipse workspace in order to start working on the code. The project structure should look like this:
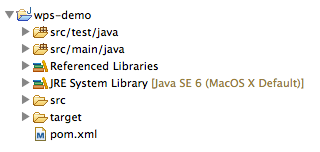
Eclipse project structure
Implement process functionality
The previous steps created a Java package org.example.wps in which to implement the custom WPS functionality. Now we will define the class that will contain the spatial processing code.
Create a class called
PolygonTools. This class contains two methods: one to split a polygon with a line (splitPolygon(Geometry poly, Geometry line)) and one to polygonize a set of Geometries (polygonize(Geometry geometry)). The polygonize method is internal to the process and does not need to be exposed as a public method. The code for thePolygonToolsclass is:package org.example.wps; import java.util.ArrayList; import java.util.Collection; import java.util.List; import com.vividsolutions.jts.geom.Geometry; import com.vividsolutions.jts.geom.GeometryFactory; import com.vividsolutions.jts.geom.Polygon; import com.vividsolutions.jts.geom.util.LineStringExtracter; import com.vividsolutions.jts.operation.polygonize.Polygonizer; import org.geotools.process.factory.DescribeParameter; import org.geotools.process.factory.DescribeProcess; import org.geotools.process.factory.DescribeResult; import org.geotools.process.factory.StaticMethodsProcessFactory; import org.geotools.text.Text; public class PolygonTools extends StaticMethodsProcessFactory<PolygonTools> { public PolygonTools() { super(Text.text("Polygon Tools"), "custom", PolygonTools.class); } static Geometry polygonize(Geometry geometry) { List lines = LineStringExtracter.getLines(geometry); Polygonizer polygonizer = new Polygonizer(); polygonizer.add(lines); Collection polys = polygonizer.getPolygons(); Polygon[] polyArray = GeometryFactory.toPolygonArray(polys); return geometry.getFactory().createGeometryCollection(polyArray); } public static Geometry splitPolygon(Geometry poly, Geometry line) { Geometry nodedLinework = poly.getBoundary().union(line); Geometry polys = polygonize(nodedLinework); // Only keep polygons which are inside the input List output = new ArrayList(); for (int i = 0; i < polys.getNumGeometries(); i++) { Polygon candpoly = (Polygon) polys.getGeometryN(i); if (poly.contains(candpoly.getInteriorPoint())) { output.add(candpoly); } } return poly.getFactory().createGeometryCollection(GeometryFactory.toGeometryArray(output)); } }
Note
If not using Eclipse, you can create a new file in
wps-demo/src/main/java/org/example/wpscalledPolygonTools.java.Some things to note about the process:
- The
executemethod will be called when the WPS request is processed by GeoServer. The method takes two parameters of typeGeometry: a polygon to be split and the line doing the splitting. - The
polygonizemethod is not public because it is internal to the process and need not be exposed. - The return type of the polygonize(Geometry geometry) function is
Geometry. Each process is required to return a result, so a static void method cannot be advertised as a process. - The process will be given a namespace (prefix) of “custom”.
- The full name of the process will be custom:splitPolygon.
- The
The code contains all of the mechanics necessary to perform the process. The next step is to use annotations to describe this process for publication. These will contain descriptions of the process and its inputs and outputs, which will be exposed via the WPS DescribeProcess and GetCapabilites requests. Add the following content right above the definition of the
splitPolygonclass:@DescribeProcess(title = "splitPolygon", description = "Splits a polygon by a linestring") @DescribeResult(description = "Geometry collection created by splitting the input polygon")
The
DescripeProcessannotation provides the process description for the DescribeProcess request. TheDescribeResultannotation provides the description of the output of the process, which, as previously mentioned, isGeometry.Replace the initial definition line for the
splitPolygonclass:public static Geometry splitPolygon(Geometry poly, Geometry line) {
with the following:
public static Geometry splitPolygon(
   @DescribeParameter(name = "polygon", description = "Polygon to be split") Geometry poly,
   @DescribeParameter(name = "line", description = "Line to split the polygon") Geometry line) {
These
DescribeParameterannotations provide descriptions of the process inputs.The final file will look like this:
package org.example.wps;

import java.util.ArrayList;
import java.util.Collection;
import java.util.List;

import com.vividsolutions.jts.geom.Geometry;
import com.vividsolutions.jts.geom.GeometryFactory;
import com.vividsolutions.jts.geom.Polygon;
import com.vividsolutions.jts.geom.util.LineStringExtracter;
import com.vividsolutions.jts.operation.polygonize.Polygonizer;

import org.geotools.process.factory.DescribeParameter;
import org.geotools.process.factory.DescribeProcess;
import org.geotools.process.factory.DescribeResult;
import org.geotools.process.factory.StaticMethodsProcessFactory;
import org.geotools.text.Text;

public class PolygonTools extends StaticMethodsProcessFactory<PolygonTools> {

  public PolygonTools() {
    super(Text.text("Polygon Tools"), "custom", PolygonTools.class);
  }

  static Geometry polygonize(Geometry geometry) {
      List lines = LineStringExtracter.getLines(geometry);
      Polygonizer polygonizer = new Polygonizer();
      polygonizer.add(lines);
      Collection polys = polygonizer.getPolygons();
      Polygon[] polyArray = GeometryFactory.toPolygonArray(polys);
      return geometry.getFactory().createGeometryCollection(polyArray);
  }

  @DescribeProcess(title = "splitPolygon", description = "Splits a polygon by a linestring")
  @DescribeResult(description = "Geometry collection created by splitting the input polygon")
  public static Geometry splitPolygon(
      @DescribeParameter(name = "polygon", description = "Polygon to be split") Geometry poly,
      @DescribeParameter(name = "line", description = "Line to split the polygon") Geometry line) {

      Geometry nodedLinework = poly.getBoundary().union(line);
      Geometry polys = polygonize(nodedLinework);

      // Only keep polygons which are inside the input
      List output = new ArrayList();
      for (int i = 0; i < polys.getNumGeometries(); i++) {
          Polygon candpoly = (Polygon) polys.getGeometryN(i);
          if (poly.contains(candpoly.getInteriorPoint())) {
              output.add(candpoly);
          }
      }
      return poly.getFactory().createGeometryCollection(GeometryFactory.toGeometryArray(output));
  }
}
Note
While beyond the scope of this tutorial, we also recommend creating unit tests for your process.
Configure GeoServer
GeoTools/GeoServer uses the Java Service Provider Interface (or SPI) for plugins. We will now create the required directory and file structure for our process.
Create the
wps-demo/src/main/resources/META-INF/servicesdirectory structure.Create a text file inside this directory titled
org.geotools.process.ProcessFactorycontaining the following content:org.example.wps.PolygonTools
Save this file.
The project is now complete.
Build and deploy
In order to build the custom process, run the following command in the root directory of the project:
mvn clean installThis cleans up artifacts from previous builds, compiles the code, executes any unit tests that are present, and creates the process JAR file in the
targetdirectory. The JAR file name is taken from the project name and version (wps-demo-1.0.jarin this example).To deploy, copy the process JAR file into the application container’s
webapps/geoserver/WEB-INF/libdirectory and then restart GeoServer.
Note
Typical paths for this directory:
- Windows:
C:\Program Files\Boundless\OpenGeo\jetty\webapps\geoserver\WEB-INF\lib - OS X:
~/Library/ApplicationSupport/GeoServer/jetty/webapps/geoserver/WEB-INF/lib - Linux:
/usr/share/opengeo/geoserver/WEB-INF/lib
Test the process
Once GeoServer is running, you can verify that the new process was deployed successfully by using the WPS Request Builder. The WPS Request Builder is a utility that can run WPS processes through the UI. It can be accessed in the Demos section of the admin interface.
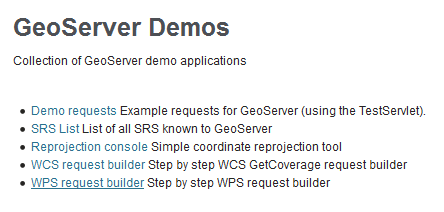
WPS Request Builder link
First verify that the
custom:splitPolygonprocess exists in the list.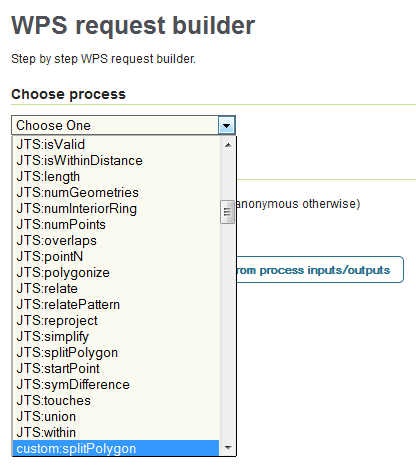
Locating the new process in the process list
Select this process. A form will be generated, showing the possible inputs and outputs.
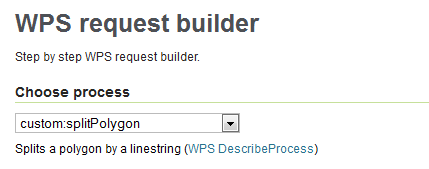
New process selected
Before filling out the form, click the WPS DescribeProcess link. This will generate a DescribeProcess request. Notice the content that was supplied in the annotations:

WPS DescribeProcess response
Fill out the form with the following options:
Option Value(s) Process inputs: polygon TEXT,application/wkt,POLYGON((0 0, 2 0, 2 1, 0 1, 0 0))Process inputs: line TEXT,application/wkt,LINESTRING(1 0, 1 1)Process outputs: result checked, Generateapplication/wkt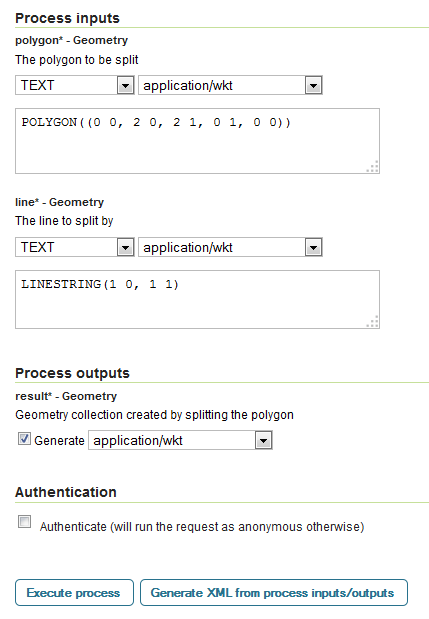
Request builder form
Click Execute process. You may be asked to open the response in a text editor.
The correct output should be:
GEOMETRYCOLLECTION (POLYGON ((1 0, 1 1, 2 1, 2 0, 1 0)), POLYGON ((1 0, 0 0, 0 1, 1 1, 1 0)))
which shows the single rectangle being split into two.