Working with multiple GeoServer users
This section discusses how to set up GeoServer with multiple users based on a common security scenario.
For more details on the mechanics of how to set up users, please read the security section of the GeoServer documentation, specifically the section on users, groups, and roles.
Users in GeoServer
GeoServer has the ability to create multiple user accounts. These users can have access to any aspect of GeoServer functionality, from the ability to edit the metadata for a workspace to the viewing of a capabilities document.
By default, GeoServer comes with two users:
- An administrative account (
admin)—This account has the ability to read or write anything in the GeoServer catalog. - A master, or
root, account—This is an administrator account of “last resort” that is only to be used for disaster recovery purposes. This account can not be disabled or modified. See the GeoServer documentation on the root account.
In addition to the named users above, many functions are available through anonymous access, with no user account required. Functions allowed anonymously by default include viewing capabilities documents, executing GetFeature and GetMap requests, and using the Demo Request Builder.
Reasons to set up a multi-user system
There are good reasons to set up accounts with granular access. Many of these considerations are not unique to GeoServer, but instead apply to any security situation:
- Need-to-know basis—Not every user should have access to the same information.
- Minimizing disaster—Accounts with more fine-grained access lack the ability to accidentally (or maliciously) inflict widespread damage to the system.
- Audit trail—Sequestering access to certain GeoServer resources allows system administrators to keep track of who has made what changes.
Multi-user scenario
This tutorial will implement the following basic security scenario:
- Most of the data to be served is public information, so anyone should be able to view map images.
- Some layers contain private information (perhaps personal or confidential), so image viewing should be disallowed unless someone has specialized access to this information.
- Only certain people should be able to edit the public layers
- Those who can edit the public layers should be the only users able to download the data.
- Certain other people should be able to edit the non-public layers
- For security and bandwidth reasons, you want to disallow WPS for all users except for the administrator.
- REST access should be enabled only for the administrator.
Based on this scenario, three accounts will need to be created:
public_editor—This account will be able to edit the public dataprivate_viewer—This account will be able to view the private dataprivate_editor—This account will be able to edit the private data
Anonymous access would be retained for viewing the public data, and the administrative account would be retained for administering GeoServer. Any account that can edit (write to) data will have the ability to view (read) that data, but while private_editor is able to edit the private data, the user will not be able to edit the public data.
Configuring catalog
Public layers as defined above will be in a workspace called public, and private layers will be in a workspace called private.
Note
The specific details of the data setup are beyond the scope of this tutorial.
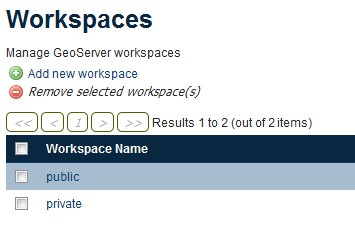
Workspaces used in this tutorial
Creating roles
Having identified the scenario and determined what accounts need to be created, the next step is to create the roles that these users will be attached to when the users are created. Based on the the three accounts identified above, the roles to be created will be called ROLE_EDIT, ROLE_PRIVATE, and ROLE_PRIVATEEDIT.
Setting up roles can be done through the GeoServer web admin interface. This will assume that the default role service will be used.
Note
For more information, see the GeoServer documentation on role services.
Open up the GeoServer web interface and log in as the administrator account.

Logged in as the administrator
Click Users, Groups, Roles under the Security column on the left side of the page.

Click to open the Users, Groups, Roles area
Under the Role Services section, click the default role service.

Click to edit the role service
Click the Roles tab at the top.

Click to view the existing roles
The current list of roles will be shown. Click Add new role.

Click to add a new role
Enter
ROLE_PRIVATEin the Name field and click Save.
Adding a new role
Repeat the process, adding two more roles,
ROLE_EDITandROLE_PRIVATEEDIT.
Full list of roles
Creating users
The next step is to create users and associate them with the newly-created roles. Note that at this point, the roles won’t “do” anything; that will come in a following step.
Click back to Users, Groups, Roles under the Security column on the left side of the page.
Under the User/group services section, click the default user/group service.

Click to edit the user/group service
Click the Users tab. This will show the current list of users.

Click to view the existing users
Click Add new user.

Click to add a new user
Fill out the form with the following information, leaving all other fields blank:
- In the User name field, enter
public_editor. - In the Password field and Confirm password field, enter a password.
- In the area titled Roles taken from active role service: default, click
ROLE_EDITand slick the right-arrow to move the role to the Selected box.

Adding a new user
- In the User name field, enter
Click Save.
Click Add new user again and repeat the above process, creating two new users,
private_viewerandprivate_edit, and associating them with theROLE_PRIVATEandROLE_PRIVATEEDITroles, respectively.
Setting permissions
With users created and attached to roles, the next step is to apply security restrictions to these roles.
Refer to the above numbered list of requirements for this scenario:
1. Allow anonymous viewing of public layers
By default all layers are public, so this requirement has been already been met.
2. Restrict viewing of private layers
The private workspace is set up to store the private data. The private_viewer and private_editor accounts should be the only accounts that are able to read the content of this workspace.
Click Data in the Security menu on the left side of the page.

Click to open the data rules area
Click Add new rule.

Click to add a new rule
Fill out the form with the following information:
- In the Workspace box, select private.
- In the Layer box, select * (asterisk).
- In the Access mode box, select Read.
- in the Roles section, click ROLE_PRIVATE and ROLE_PRIVATEEDIT and then click the right-arrow to move both roles to the Selected box.

Creating a rule to restrict viewing of private layers
Click Save.
3. Restrict editing of public layers
The public workspace is set up to store the public data. While anonymous access will be retained for viewing layers in this workspace, the public_editor user should be the only user to be able to edit layers in this workspace.
Click Add new rule again.
Fill out the form with the following information:
- In the Workspace box, select public.
- In the Layer box, select * (asterisk).
- In the Access mode box, select Write.
- in the Roles section, click ROLE_EDIT and then click the right-arrow to move the role to the Selected box.

Creating a rule to restrict editing of public layers
Click Save.
4. Restrict downloading of layer data
The public_editor and private_editor users are the only users that should have access to download layer data. This means that the ROLE_EDIT and ROLE_PRIVATEEDIT should be the only roles that have access to WFS.
Click Services in the Security menu on the left side of the page.

Click to open the service rules area
Click Add new rule.

Click to add a new service rule
Fill out the form with the following information:
- In the Service box, select wfs.
- In the Method box, select * (asterisk).
- in the Roles section, click ROLE_EDIT and ROLE_PRIVATEEDIT and then click the right-arrow to move both roles to the Selected box.

Creating a new service rule
Click Save.

Completed rule
5. Restrict editing of the private layers
The private_editor user has been given read access to the private workspace, but needs to also be given write access as well.
Click Data in the Security menu on the left side of the page.
Click Add new rule.
Fill out the form with the following information:
- In the Workspace box, select private.
- In the Layer box, select * (asterisk).
- In the Access mode box, select Write.
- in the Roles section, click ROLE_PRIVATEEDIT and then click the right-arrow to move the role to the Selected box.

Creating a new data access rule
Click Save.

Complete list of data access rules
6. Restrict WPS
The Web Processing Service (WPS) can impose a strong performance penalty if left unsecured. As it is not necessary in this scenario, it will be restricted to the administrator account only.
Click Services in the Security menu on the left side of the page.
Click Add new rule.
Fill out the form with the following information:
- In the Service box, select wps.
- In the Method box, select * (asterisk).
- in the Roles section, click ADMIN and then click the right-arrow to move the role to the Selected box.

Creating a rule that restricts WPS
Click Save.

Complete list of service access rules
Note
WPS processes can be restricted by roles on a per-process or per-process group basis. See the section on Restricting access to WPS processes for more details.
7. Restrict REST access except for the administrator
The REST interface is configured to be accessed by the administrator by default, so this requirement has already been met.
Viewing permissions
Check that the setup is correct by comparing settings to the following configuration files.
Users
In the default user/group service, settings are stored in plain (XML) text in the GeoServer data directory at security/usergroup/default/users.xml and should look like the following:
<?xml version="1.0" encoding="UTF-8"?>
<userRegistry version="1.0" xmlns="http://www.geoserver.org/security/users">
    <users>
        <user enabled="true" name="admin" password="crypt1:34AorA43+YRaP5Ndflc2plv9et1Lrvz2"/>
        <user enabled="true" name="private_editor" password="crypt1:kMacwSIx/i6t0WMh9Q0g33+DNIJKmd1I"/>
        <user enabled="true" name="private_viewer" password="crypt1:J8XrZXsHP4efI1C8mXqPScvb91I4h3jQ"/>
        <user enabled="true" name="public_editor" password="crypt1:N0aHmlK3ftdguggsXKtL4oeX0amjMW8I"/>
    </users>
    <groups/>
</userRegistry>
The specific password hashes will differ according to the passwords used.
Roles
In the default role service, settings are stored in plain (XML) text in the GeoServer data directory at security/role/default/roles.xml and should look like the following:
<?xml version="1.0" encoding="UTF-8"?>
<roleRegistry version="1.0" xmlns="http://www.geoserver.org/security/roles">
    <roleList>
        <role id="ADMIN"/>
        <role id="GROUP_ADMIN"/>
        <role id="ROLE_EDIT"/>
        <role id="ROLE_PRIVATE"/>
        <role id="ROLE_PRIVATEEDIT"/>
    </roleList>
    <userList>
        <userRoles username="admin">
            <roleRef roleID="ADMIN"/>
        </userRoles>
        <userRoles username="private_editor">
            <roleRef roleID="ROLE_PRIVATEEDIT"/>
        </userRoles>
        <userRoles username="private_viewer">
            <roleRef roleID="ROLE_PRIVATE"/>
        </userRoles>
        <userRoles username="public_editor">
            <roleRef roleID="ROLE_EDIT"/>
        </userRoles>
    </userList>
    <groupList/>
</roleRegistry>
Services
Service permissions are stored in plain text in the GeoServer data directory at security/services.properties. and should look like this:
*.*=*
wfs.*=ROLE_EDIT,ROLE_PRIVATEEDIT
wps.*=ADMIN
Layers
Layer permissions are stored in plain text in the GeoServer data directory at security/layers.properties. and should look like the following:
*.*.r=*
*.*.w=*
private.*.r=ROLE_PRIVATE,ROLE_PRIVATEEDIT
private.*.w=ROLE_PRIVATEEDIT
mode=HIDE
Testing the scenario
There are a few different tests to ensure that the above rules have been implemented properly.
Anonymous access
To test anonymous access, log out of GeoServer and perform the following tests:
| Test | Expected result |
|---|---|
View a layer (via the Layer Preview) in the public workspace |
Success |
View a layer (via the Layer Preview) in the private workspace |
Failure |
| Execute a WMS GetCapabilities request | Only public layers will display |
| Execute a WFS GetCapablities request | Failure |
Edit a layer in the public workspace |
Failure |
public_editor access
To test access via the public_editor user, log in as that user and perform the following tests:
| Test | Expected result |
|---|---|
View a layer (via the Layer Preview) in the public workspace |
Success |
View a layer (via the Layer Preview) in the private workspace |
Failure |
| Execute a WMS GetCapabilities request | Only public layers will display |
| Execute a WFS GetCapablities request | Only public layers will display |
Edit a layer in the public workspace |
Success |
Edit a layer in the private workspace |
Failure |
private_viewer access
To test access via the private_viewer user, log in as that user and perform the following tests:
| Test | Expected result |
|---|---|
View a layer (via the Layer Preview) in the public workspace |
Success |
View a layer (via the Layer Preview) in the private workspace |
Success |
| Execute a WMS GetCapabilities request | Both public and private layers will display |
| Execute a WFS GetCapablities request | Failure |
Edit a layer in the public workspace |
Failure |
Edit a layer in the private workspace |
Failure |
private_editor access
To test access via the private_editor user, log in as that user and perform the following tests:
| Test | Expected result |
|---|---|
View a layer (via the Layer Preview) in the public workspace |
Success |
View a layer (via the Layer Preview) in the private workspace |
Success |
| Execute a WMS GetCapabilities request | Both public and private layers will display |
| Execute a WFS GetCapablities request | Both public and private layers will display |
Edit a layer in the public workspace |
Failure |
Edit a layer in the private workspace |
Success |
In addition, the administrator account should be able to accomplish all of the above tests.